


That constant drip, drip, drip from my kitchen faucet was driving me insane.
- Why Faucets Leak (And Why It’s Usually an Easy Fix)
- What You Need Before You Start
- Step-by-Step: How to Fix a Leaky Faucet
- Step 1: Turn Off the Water
- Step 2: Plug the Drain
- Step 3: Remove the Faucet Handle
- Step 4: Remove the Packing Nut
- Step 5: Remove the Stem or Cartridge
- Step 6: Inspect and Replace the Washer or O-Ring
- Step 7: Clean Everything and Reassemble
- Step 8: Turn the Water Back On and Test
- What If Your Faucet Has a Cartridge Instead of Washers?
- Common Mistakes to Avoid
- What If It Still Leaks After You Fix It?
- How Much This Saves You
- Why I’m Glad I Learned This
- Frequently Asked Questions
- Just Try It
It had been leaking for three months. Not a big gushing leak, just a slow drip. But it was wasting water, making noise at night, and slowly staining the sink.
I got a quote from a plumber. $150 just to come out and look at it, plus parts and labor. Probably $200 to $250 total.
For a dripping faucet.
So I decided to try fixing it myself. I watched two YouTube videos, bought a $5 part at the hardware store, and fixed it in 30 minutes.
That was two years ago. The faucet hasn’t leaked since.
Here’s exactly how to fix a leaky faucet yourself, even if you’ve never done any plumbing before.
Why Faucets Leak (And Why It’s Usually an Easy Fix)
Faucets leak for a few main reasons:
Worn out washer or O-ring. These are small rubber pieces inside the faucet that create a seal. Over time they wear out and don’t seal properly anymore.
Worn out cartridge. Some faucets use a cartridge instead of washers. Same idea. It wears out and needs replacing.
Loose parts. Sometimes a part just came loose and needs to be tightened.
Corrosion or mineral buildup. Hard water can cause buildup that prevents proper sealing.
About 90 percent of the time, it’s a worn out washer, O-ring, or cartridge. These cost $2 to $10 to replace.
The actual work takes 20 to 40 minutes depending on your faucet type.
You don’t need to be handy. You just need to follow the steps and not lose any small parts.
What You Need Before You Start
Tools:
- Adjustable wrench or pliers
- Screwdriver (flathead and Phillips head)
- Small container or towel (to hold small parts so you don’t lose them)
- Flashlight (to see inside the faucet)
Materials:
- Replacement washer, O-ring, or cartridge (you’ll figure out which one after you take it apart)
- Plumber’s grease (optional but helpful, costs about $3)
If you don’t know what part you need yet, that’s okay. You’ll take the faucet apart, see what’s worn out, then go to the hardware store with the old part to get a matching replacement.
Step-by-Step: How to Fix a Leaky Faucet
I’m going to walk through the most common type of faucet (compression faucet with washers). If you have a cartridge faucet, the process is slightly different but similar.
Step 1: Turn Off the Water
This is important. Don’t skip this.
Look under your sink. You’ll see two small valves (one for hot, one for cold). Turn them both clockwise to shut off the water.
If you can’t find shut-off valves under the sink, you’ll need to turn off the main water supply to your house. It’s usually in the basement or outside near the water meter.
Turn on the faucet to drain any water left in the lines.
Step 2: Plug the Drain
Put the sink stopper in or cover the drain with a towel.
This prevents small screws and parts from falling down the drain while you work. Trust me, you don’t want to lose a tiny screw in your pipes.
Step 3: Remove the Faucet Handle
Look for a small screw on the faucet handle. It might be hidden under a cap that says “Hot” or “Cold.” Pry off the cap with a flathead screwdriver.
Use a screwdriver to remove the screw.
Pull the handle straight up to remove it. You might need to wiggle it a bit.
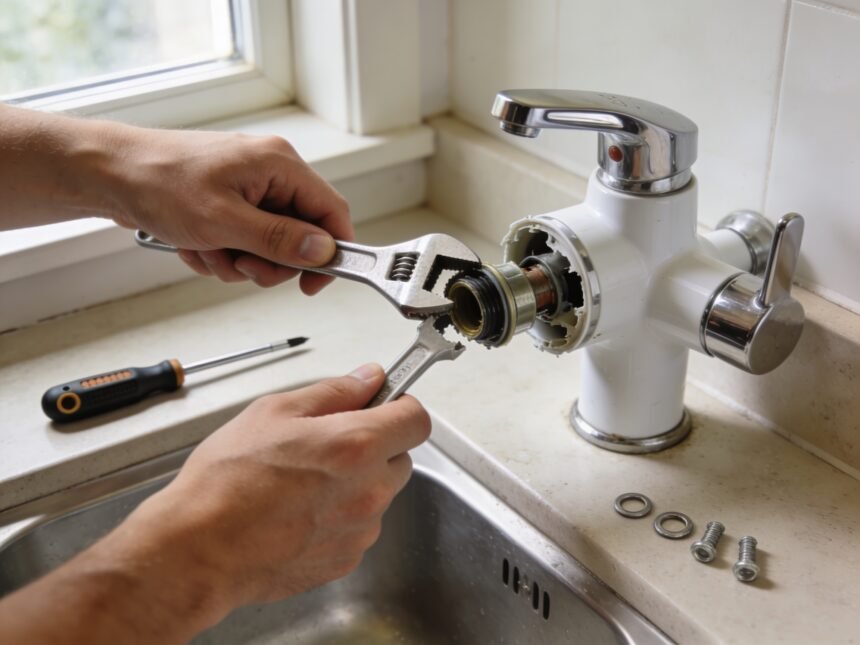
Step 4: Remove the Packing Nut
Once the handle is off, you’ll see a large hexagonal nut (the packing nut).
Use an adjustable wrench or pliers to turn it counterclockwise and remove it.
Under the packing nut, you’ll see the stem or cartridge. This is the part you’ll need to remove.
Step 5: Remove the Stem or Cartridge
Turn the stem counterclockwise to unscrew it and pull it out.
Set it aside on a towel.
Now you can see inside the faucet. Look for the washer or O-ring.
Step 6: Inspect and Replace the Washer or O-Ring
At the bottom of the stem, you’ll see a small rubber washer held in place by a tiny screw.
If the washer looks worn, cracked, or flat, that’s your problem.
Remove the screw. Take out the old washer. Replace it with a new one that’s the exact same size.
Also check the O-ring (a rubber ring around the stem). If it looks worn, replace it too.
If you don’t have replacement parts yet, take the old washer and O-ring to the hardware store and ask for exact matches.
Step 7: Clean Everything and Reassemble
Before putting everything back together, clean any mineral deposits or gunk from the parts.
Use a damp cloth to wipe everything down.
If you have plumber’s grease, put a tiny bit on the new washer and O-ring. This helps them seal better and last longer.
Now reassemble everything in reverse order:
Put the stem back in and screw it clockwise.
Put the packing nut back on and tighten it with the wrench.
Put the handle back on and replace the screw.
Snap the cap back on.
Step 8: Turn the Water Back On and Test
Turn the shut-off valves back on (or turn your main water back on).
Turn on the faucet to check for leaks.
If it’s not leaking, you’re done. Congratulations, you just fixed your faucet.
If it’s still leaking, you might need to tighten the packing nut a bit more, or the cartridge might need replacing instead of just the washer.
What If Your Faucet Has a Cartridge Instead of Washers?
Some modern faucets use a cartridge instead of washers and O-rings. The process is similar but slightly different.
Remove the handle the same way (unscrew the small screw under the cap).
Instead of a packing nut, you’ll see a retaining clip or nut holding the cartridge in place. Remove it.
Pull the cartridge straight out. You might need to wiggle it or use pliers.
Take the old cartridge to the hardware store to get an exact replacement. Cartridges are specific to each faucet brand.
Install the new cartridge. Make sure it’s oriented correctly (there’s usually a notch or flat side that needs to face a certain direction).
Reassemble and test.
Cartridge replacement is actually easier than dealing with washers because it’s just one part. But cartridges cost more, usually $15 to $30.
Common Mistakes to Avoid
I made a few mistakes when I first did this. Here’s what to avoid:
Forgetting to turn off the water. Don’t do this. You’ll flood your kitchen.
Losing small parts. Use a towel or container to keep screws and washers organized. If you lose a tiny screw, you’ll have a bad time.
Using the wrong size washer. Washers need to be exact. Take the old one to the store to match it. If it’s too big or too small, your faucet will still leak.
Over-tightening. When you reassemble, hand-tight plus a quarter turn with a wrench is usually enough. Over-tightening can damage parts.
Skipping the plumber’s grease. It’s optional but it helps. A $3 tube lasts for years.
What If It Still Leaks After You Fix It?
If you replaced the washer and O-ring and it’s still leaking, a few things might be wrong:
The seat is damaged. The seat is the part inside the faucet that the washer presses against. If it’s corroded or scratched, a new washer won’t help. You can replace the seat with a seat wrench (about $5) or call a plumber.
You need a new cartridge. If your faucet uses a cartridge and replacing the washers didn’t help, you need a new cartridge.
The faucet is really old. If your faucet is 15+ years old and multiple parts are worn out, it might be time to replace the whole faucet instead of just fixing parts.
But honestly, 90 percent of leaks are fixed with a new washer or O-ring.
How Much This Saves You
A plumber charges $150 to $250 to fix a leaky faucet.
Doing it yourself costs:
Washer and O-ring: $2 to $5
Plumber’s grease: $3 (optional)
Tools if you don’t have them: $10 to $15
Total: $5 to $20 vs. $150 to $250.
You save at least $130. Maybe more.
And now you know how to do it, so the next time a faucet leaks, you can fix it in 20 minutes without calling anyone.
Why I’m Glad I Learned This
Fixing that first leaky faucet gave me so much confidence.
I went from “I can’t fix anything” to “I can at least try before calling someone.”
Since then I’ve fixed:
Three more leaky faucets
A running toilet
A loose cabinet door
Several clogged drains
All stuff I would have paid someone to fix before.
Total saved: probably over $800 in the last two years.
For more beginner DIY repairs, check out:
- 5 home repairs you can do with zero experience
- Home repairs I learned from YouTube that saved me $800
Frequently Asked Questions
How do I know what type of faucet I have?
You usually figure this out when you take it apart. Compression faucets have separate hot and cold handles and use washers. Cartridge, ball, and ceramic disc faucets usually have a single handle. If you’re not sure, take a picture of your faucet and show it to someone at the hardware store.
Can I fix a leaky faucet without turning off the water?
Absolutely not. You need to turn off the water. If you don’t, you’ll have water spraying everywhere as soon as you start taking things apart. Always turn off the water first.
What if I can’t get the faucet apart?
Sometimes parts are stuck from mineral buildup or corrosion. Try spraying with WD-40 or vinegar and letting it sit for 10 minutes. Then try again with more force. If it’s really stuck, you might need to call a plumber or replace the whole faucet.
How long do washers and O-rings last?
Usually 3 to 7 years depending on water quality and usage. If you have hard water, they wear out faster. Once you replace them, your faucet should be good for several more years.
Should I replace washers in all my faucets at once?
No, only replace them when a faucet starts leaking. If a faucet isn’t leaking, leave it alone. You’re not preventing anything by replacing washers early. Just wait until they actually need it.
What if the leak is coming from the base of the faucet, not the spout?
That’s usually an O-ring issue. Follow the same steps to take the faucet apart and replace the O-rings around the stem and base. Sometimes there are multiple O-rings, so check them all.
Just Try It
I know plumbing sounds intimidating. But this repair is genuinely beginner-friendly.
The worst that can happen is you take it apart, realize you’re in over your head, and call a plumber. You’re in the same position you would have been anyway.
But most likely, you’ll take it apart, see a worn out washer, replace it, and fix the leak yourself in 30 minutes.
And you’ll save $150.
Set aside an hour this weekend. Watch a YouTube video on your specific faucet type. Get your tools ready. Turn off the water. Take it apart.
You can do this. I promise.
And once you fix your first faucet, you’ll feel brave enough to try other repairs. That’s how it starts. One simple fix at a time.
Good luck. You’ve got this.


Have you ever fixed a faucet before? Check out these easy steps. #DIY #HomeRepairs #PlumberSkills #CozyCornerDaily