


If one more makeover video tells you that you need a thousand dollars and a whole construction crew to fix your ugly kitchen, I might scream.
- Why peel and stick actually works now
- Before you start: two rules that will save you
- Upgrade 1: the fake tile backsplash that changes the whole room
- Upgrade 2: renter friendly “stone” or “marble” counters
- Upgrade 3: peel and stick floor tiles in “ugly but clean” spaces
- Upgrade 4: an accent wall that does not scare your landlord
- Upgrade 5: faux “wood” or slat wall without lumber
- Upgrade 6: peel and stick “lighting” moments
- Upgrade 7: tiny finishing details so it does not scream “sticker”
- What I would not do again
- How this fits your budget and your energy
- FAQs about peel and stick makeovers
I still remember standing in our very average kitchen one Friday night, staring at a weird beige backsplash that somehow always looked dirty even when I had just scrubbed it. The cabinets were fine. The layout was fine. The whole space just felt tired. I kept telling myself we would wait and “do it right” one day with new cabinets and real tile, the same way I used to promise myself I would “fix our money later” before I finally made those five simple changes that saved us $400 a month in this story.
Later never magically showed up. So I gave myself one small rule. One weekend. Under $100. Everything had to be renter friendly and removable. No “well technically this is semi permanent” nonsense. I honestly thought it would look cheap in person and I would quietly peel it all off a week later. Instead, it made the space feel like ours.


If you are already in the middle of a bigger reset and slowly trying to make your house feel less chaotic, this kind of project fits really nicely next to things like my 30 Day Home Reset Challenge or the 15 minute daily cleaning routine that keeps the house from falling apart. Think of peel and stick as the “fun reward” layer you add after you clear a space, not the thing you do instead of dealing with clutter.
Why peel and stick actually works now
I used to think peel and stick was just flimsy contact paper that bubbled the second you looked at it wrong. The stuff out now is different. You have thicker tiles that mimic real ceramic, wallpapers that come off in big sheets instead of tiny scraps, and floor tiles that hold up surprisingly well in high traffic areas if your prep is decent.
The best part, especially if you rent, is that you get to experiment. You do not have to commit to a tile pattern for ten years. You can add personality without risking your security deposit, the way a lot of renters are doing now with peel and stick backsplashes, floors, and accent walls.
And here is the sneaky benefit. When a space looks a little better, it is easier to keep up with it. That is exactly what happened when I finally built a kitchen cleaning routine that stopped my kitchen from being a disaster zone. Once the room felt calmer, I naturally wanted to keep it that way.
Is peel and stick perfect? No. Some products do not hold up in constant steam, some leave residue, and some patterns look way busier on your wall than they did on your phone. But used wisely, it is one of the fastest ways to get that “I actually like being in here” feeling without a full renovation.
Before you start: two rules that will save you
Rule one: prep more than you think you need to.
Every tutorial says this and I still tried to rush. I wiped surfaces half‑heartedly, slapped tiles on, then spent extra time fixing bubbles and corners that would not stick. Clean your walls or backsplash with a grease cutting cleaner, let them dry fully, and take outlet covers off before you start. If your kitchen already feels grimy no matter what you do, it helps to run through a quick 5 minute kitchen reset before you even open the tile box.
Rule two: sample first, then commit.
Buy one roll or one box, and live with a test piece for a day or two. Look at it in morning light, at night with warm lamps, and when there are actual dishes and lunchboxes on the counters. I had a pattern that looked soft and subtle online and turned into “cartoon kitchen” on our wall. I was so glad I learned that on a ten dollar sample instead of a full order.
If you are in that “my whole house feels like too much” place, start with one high‑impact zone. It is the same logic I use when I talk about what to declutter first for the biggest difference. You need one visible win that tells your brain, ok, this is working.
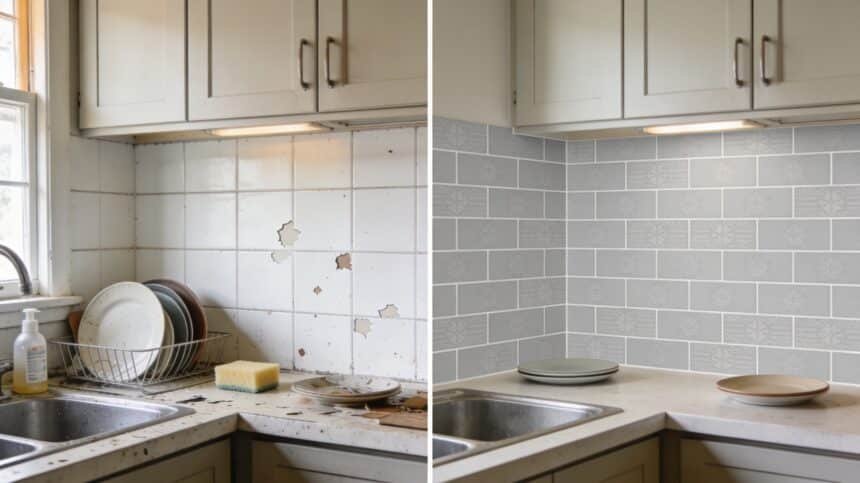
Upgrade 1: the fake tile backsplash that changes the whole room
Let’s start with the big mood shift. Peel and stick backsplash. If you are only going to do one peel and stick project, I would pick this one. A simple subway tile pattern or clean geometric design can instantly make your kitchen look more intentional and less “builder basic with random stuff on the counters.”
What worked best for me was choosing a matte finish tile. Shiny can read plasticky in person. I measured the wall twice, added roughly 15 percent for mistakes, and started in the most visible corner instead of behind the microwave. That way, your cleanest lines live where your eye lands first.
The stressy part is always outlets. You want to peel back only part of the backing, hold the sheet in place, lightly mark your cut lines, then trim with sharp scissors or a utility knife before you commit. Clean outlet edges make the whole backsplash read as more “real tile” in photos and in person.
If your kitchen also doubles as the place where school forms, bills, and random mail pile up, this is a good moment to think about your paper system. Moving that chaos into a simple family command center keeps it off your pretty new walls and out of your brain.
Upgrade 2: renter friendly “stone” or “marble” counters
Countertop films are where I am picky, because this is where a bad product will scream “sticker” in two weeks. There are peel and stick options now that genuinely look like stone or marble from a normal distance and hold up decently if you treat them kindly.
When we lived with orange speckled counters, I finally tried a matte marble film. I avoided putting it right next to stove burners, used cutting boards for everything, and wiped up spills quickly. It was not perfect. But it made the whole room feel less like a college apartment.
The trick is to work in sections. Cut pieces slightly bigger than you need, lay them down gently while you are still able to lift and adjust, and use a smoothing tool to push out air bubbles as you go. Wrap the front lip of the counter slowly. Corners and edges are where cheap jobs show, so that is where you go slow.
If you are also in that season where you are learning how to clean properly for the first time, you might want the first apartment cleaning kit so you are not accidentally stripping or scratching your new surface with harsh products.
Upgrade 3: peel and stick floor tiles in “ugly but clean” spaces
Peel and stick floor tile has exploded for a reason. You can cover dated linoleum or bland tile in a bathroom or laundry room without demo, and suddenly the room looks planned.
Where I think it shines: half baths, small bathrooms, laundry closets, mudrooms, entryways. Areas that see a lot of eyeballs but not necessarily heavy furniture dragging around. Prep really matters here. Sweep, mop, and make sure the floor is completely dry and as smooth as you can reasonably get it. Some people even lightly fill deep grout lines to avoid dips.
In our small bathroom, a simple black and white pattern made the vanity and mirror look more intentional, even though those pieces were very basic. If you are nervous, try creating a “fake rug” in front of the sink with tiles first instead of committing to the whole room.
And if this is one of your first DIY projects, pairing it with one or two easy home fixes from my list of simple home repairs every parent should learn can build up your confidence fast.
Upgrade 4: an accent wall that does not scare your landlord
This is the project that made our rental bedroom feel like an actual room and not just the place where the bed lives. I added peel and stick wallpaper behind the headboard. One wall. That was it. It took a couple of hours, a lot of “wait, that is crooked, peel it back,” and one snack break, but when I stepped back, the whole room felt pulled together.
Patterns matter here. If your bedding is already busy, go softer on the wall. If everything you own is neutral, you can lean into florals, stripes, or bolder graphics. Temporary wallpaper brands have come a long way, and most of the renter friendly options are designed to peel off in sheets when you move.
The only catch: if your closet is still a full disaster, you are not going to feel relaxed just because one wall looks pretty. Getting a simple closet organization system in place first did more for my morning sanity than any wallpaper ever could.
Upgrade 5: faux “wood” or slat wall without lumber
Those trendy slat walls you see on Pinterest? You can absolutely fake that look in a rental now. There are peel and stick panels and slat‑style strips that give you vertical lines and warmth without buying lumber and lugging out a saw.
Some wood prints look very fake, so samples are your friend. Look for a matte finish and a pattern that does not repeat in a super obvious way. Behind a TV, in a tiny entry, or as a half wall in a dining nook, it gives you instant “this was planned” energy.
In tight spaces, I like pairing this kind of wall detail with storage that actually works in real life. Hooks for backpacks, a small bench, one basket. It is the same mindset I used when I finally got sick of tripping over stuff and took back our small space.
Upgrade 6: peel and stick “lighting” moments
This one surprised me the most. Some of my favorite rental friendly “lighting upgrades” are not real wiring at all. They are peel and stick plus wireless lights.
You can hang a cute sconce and put a battery puck light inside, or run peel and stick LED strips under cabinets and along shelves to create soft glow instead of harsh overhead light. Is it the same as hardwired fixtures? No. But in a dark hallway or above a kitchen counter, it is a massive quality‑of‑life upgrade.
If evenings are the hardest time of day for you, especially with kids and homework and dishes, dialing in gentle lighting fits really nicely alongside the evening routine that saved my sanity instead of adding more chaos.
Upgrade 7: tiny finishing details so it does not scream “sticker”
The last layer is the small stuff. Edge trim. Caulk where your peel and stick meets the counter or baseboard. Fresh outlet covers that are not yellowed from age. These are the things that move your project from “late‑night experiment” to “did you hire someone?”
A thin bead of paintable caulk at the top of a backsplash makes it feel more built in. Matching outlet covers and switch plates are cheap and instantly make the whole wall look cleaner. These details also give you a chance to slow down and see if anything needs smoothing or trimming before you call it done.
I think about it the same way I think about budgets. The tiny, unglamorous tweaks are what stop the leaks, whether that means finally doing a quick subscription audit with a simple cancel script or deciding you are done paying accidental late fees for bills that got buried under junk mail.
What I would not do again
Ok, failures. I would not use super cheap, glossy contact paper on high heat or high moisture areas ever again. It curled at the edges, collected crumbs, and left sticky residue when I pulled it up. I also would not put heavy textured products on very textured walls without testing first. They just did not grab well enough, and I ended up fighting with lifting corners.
I am also careful with really bold patterns in small, already busy rooms. A loud tile plus visual clutter from toys, dishes, and mail is a fast track to feeling overwhelmed. If you are already drowning in stuff, I would start with simpler patterns and pair this with a gentle plan for how to start decluttering when you are completely overwhelmed, so your eyes have somewhere to rest.
How this fits your budget and your energy
If you are trying to calm both your home and your money at the same time, you do not need your DIY projects working against you. The sweet spot I have found is stacking these makeovers on top of systems you already have. Use something like the 30 Day Home Reset, your spring cleaning checklist, or a simple pantry organization project as the backbone, then layer in a small peel and stick project once a zone is cleaned and decluttered.
Budget‑wise, I treat projects like this the same way I treat takeout or extras. They have a category. If I am doing a no‑spend weekend or tightening our grocery strategy to cut the bill, I will let a small home upgrade be the one fun thing that month instead of another unplanned Amazon order. My personal rule is that if I cannot cash flow the project without touching bills or savings, it waits.
When in doubt, start with the spot you see first thing in the morning or last thing at night. That might be your kitchen sink, a hallway, or your bedroom wall. Give yourself permission to make that one space feel good now, within your real budget, in this imperfect season. The big “someday” renovation can wait.
FAQs about peel and stick makeovers
Is peel and stick really renter friendly?
Most of the time, yes, if you choose products labeled removable and follow the instructions. Higher quality peel and stick wallpaper and tile is designed to come off in sheets without damaging paint or tile underneath. Always test a small area first, especially if your walls were never primed properly.
How long does peel and stick last?
With decent prep and normal use, many renters and homeowners see peel and stick hold up for several years. In high traffic or very steamy areas, you might see wear sooner, so it helps to think of it as a “phase one” makeover instead of a 15‑year solution.
Can I use peel and stick in a bathroom or around a shower?
You can use certain peel and stick products on bathroom walls and floors, but you need to avoid direct water spray and super steamy, unventilated spots. Around a shower, traditional tile or panels made for wet zones are safer. On walls away from direct water, you are usually fine if the surface is clean and smooth.
Will peel and stick damage my walls or counters?
If you pick removable products and do not stick them to surfaces that are already peeling, greasy, or unpainted, they typically come off clean. Some cheaper films can leave residue, which is why starting in a closet or behind an appliance is a smart way to test before committing to a full wall.
Is it worth it if I am on a very tight budget?
Honestly, I think yes, if you are strategic. One small peel and stick project can make your kitchen or entryway feel better to be in every single day, and that has real mental load value. Start with the area you see first thing in the morning, or the space that annoys you the most, and keep it under that $100 limit. If you are rebuilding your whole money system from the ground up, the brutally honest budget that finally worked for us can help you decide where projects like this fit.


