


My first apartment kitchen was about 60 square feet. Maybe less.
- The Golden Rule for Small Kitchens
- Step 1: Declutter First (This Is Not Optional)
- Step 2: Use Vertical Space Like Your Life Depends on It
- Step 3: The Kitchen Zone System for Small Spaces
- Step 4: Multi-Use Tools Only
- Step 5: Clear the Counter (Yes, Really)
- Step 6: Use Drawer Dividers and Cabinet Organizers
- Step 7: Store Food Strategically
- The 5 Organization Rules for Tiny Kitchens
- What About When You’re Cooking?
- Small Kitchens Are Actually Easier to Maintain
- Frequently Asked Questions
- Start With the Declutter
Two tiny cabinets. Four drawers. A narrow counter barely big enough for a cutting board. And a stove so close to the sink I’d burn myself reaching for the faucet.
I thought there was no way to keep it organized. There just wasn’t enough space for all the stuff you need in a kitchen.
Turns out I was wrong. The problem wasn’t the size. The problem was that I was organizing it like a big kitchen and trying to fit too much stuff into too little space.
Once I figured out the right system for small kitchens, everything changed. My tiny kitchen actually worked. And honestly, it was easier to keep clean than the big kitchen I have now.
Here’s exactly how to organize a small kitchen when you have basically zero storage.
The Golden Rule for Small Kitchens
Big kitchens can get away with having stuff you rarely use. Small kitchens can’t.
If you don’t use it regularly, it doesn’t belong in your kitchen. Period.
That bread maker you got for Christmas and used once? Gone. The fancy serving platters for parties you never host? Gone. The 12-piece knife set when you only use two knives? Keep the two, get rid of the rest.
Small kitchens force you to be ruthless. And honestly? That’s a good thing. You end up keeping only what you actually use, which makes cooking way easier.
I got rid of probably 40 percent of my kitchen stuff when I moved into that tiny apartment. And I never missed any of it.
Step 1: Declutter First (This Is Not Optional)
Before you organize anything, you have to declutter. Otherwise you’re just trying to organize too much stuff in too little space, and it’ll never work.
Pull everything out of your cabinets and drawers. Yes, everything.
Go through each item and ask: Do I actually use this? Have I used it in the last three months? Do I have duplicates?
Get rid of:
Duplicate tools. You don’t need three wooden spoons or five spatulas.
Single-use gadgets. That avocado slicer, garlic press, egg separator. If it only does one thing, you probably don’t need it.
Dishes and cups you never use. Keep enough for your household plus maybe two extras for guests. Everything else goes.
Pots and pans you don’t use. One good skillet, one pot, and one baking sheet will cover 90 percent of cooking.
Expired food and spices. Check dates. Toss anything old or stale.
I ended up with:
Two knives (chef’s knife and paring knife)
One cutting board
One skillet, one pot, one baking sheet
Basic utensils (spatula, spoon, tongs, can opener)
Four plates, four bowls, four cups
Essential spices (salt, pepper, garlic powder, Italian seasoning)
One mixing bowl
Measuring cups and spoons
That’s it. And I cooked full meals every day with just that stuff.
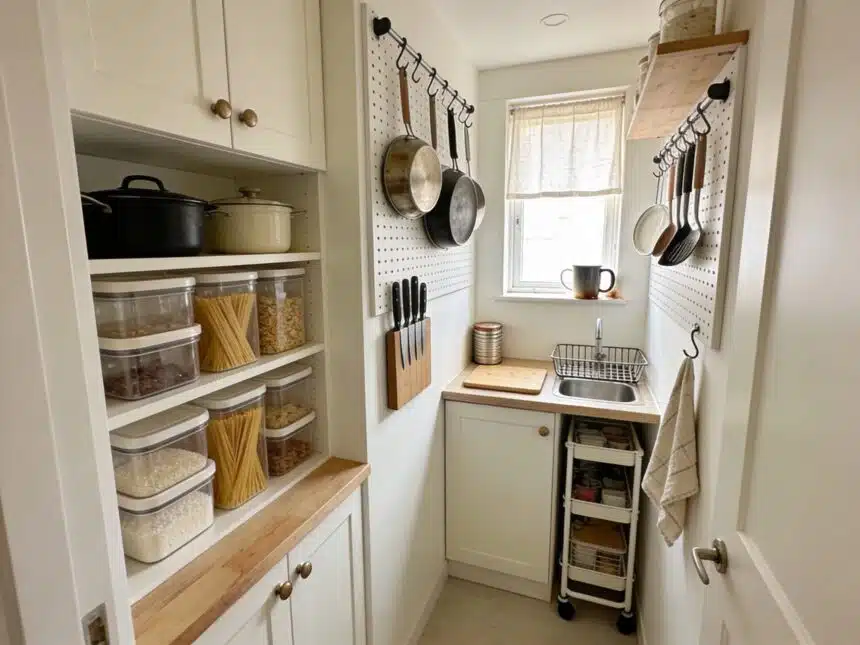
Step 2: Use Vertical Space Like Your Life Depends on It
Small kitchens have limited counter and cabinet space. But they usually have walls.
Use them.
Hang stuff on the walls:
I put up a simple tension rod between two walls and hung my most-used utensils with S-hooks. Spatula, spoon, tongs, measuring cups. All within arm’s reach while cooking.
You can also use adhesive hooks to hang dish towels, oven mitts, aprons, anything with a loop.
If you’re allowed to drill (not in a rental), a pegboard or wall-mounted rail system is amazing. Hang pots, pans, utensils, whatever you need.
Use the inside of cabinet doors:
Stick adhesive hooks on the inside of cabinet doors to hang measuring spoons, pot holders, small cutting boards, lids.
This was a game changer. Suddenly I had storage space I didn’t even know existed.
Stack upward, not outward:
Use shelf risers in cabinets so you can stack plates, bowls, and cups higher without them getting unstable.
Store things vertically when possible. Baking sheets, cutting boards, and pot lids can stand upright in a file organizer or magazine holder instead of stacking flat.
Step 3: The Kitchen Zone System for Small Spaces
This is the system that made my tiny kitchen actually work. It’s based on zones.
Instead of organizing by item type (all plates together, all pots together), you organize by task. Everything you need for one type of cooking task lives in one spot.
Here’s how I set it up:
Coffee/Breakfast Zone:
Coffee maker, mugs, coffee, sugar, spoon. All in one small area. I could make coffee without moving from that spot.
Cooking Zone:
Skillet, pot, cooking utensils, oils, spices. All near the stove so I could grab what I needed while cooking.
Prep Zone:
Cutting board, knives, mixing bowl. On or near the small counter space I had.
Cleaning Zone:
Dish soap, sponge, dish towel. Right by the sink.
Each zone takes up minimal space because you’re only keeping the essentials for that task.
This also makes cooking way faster. You’re not running around a tiny kitchen looking for stuff. Everything you need is right there.
If you want the full detailed breakdown of the zone system, I have a guide specifically for ADHD-friendly kitchen organization that works perfectly for small kitchens too.
Step 4: Multi-Use Tools Only
In a small kitchen, everything has to earn its spot. If a tool only does one thing, it better be something you use constantly.
Otherwise, stick to multi-use tools.
Instead of five different knives: One good chef’s knife does almost everything.
Instead of a hand mixer, stand mixer, and whisk: Just a whisk. Or a fork for most things honestly.
Instead of multiple cutting boards: One good plastic or wood board that’s easy to clean.
Instead of separate measuring cups for wet and dry: One set of measuring cups and eyeball the liquids. Or use a single liquid measuring cup for everything.
Instead of specialty baking pans: One 9×13 pan and one baking sheet cover most recipes.
This mindset freed up so much space. I stopped trying to have every tool and just kept the versatile ones.
Step 5: Clear the Counter (Yes, Really)
I know it seems impossible in a small kitchen. But a clear counter makes the space feel bigger and gives you room to actually work.
Only keep these on the counter:
Coffee maker (if you use it daily)
Dish soap and sponge
Maybe a small plant or one decorative item if you want
Everything else goes in a cabinet or on the wall.
Your toaster can live in a cabinet and come out when you need it. Your knife block can be replaced with one knife in a drawer. Your utensil holder can be replaced with a wall-mounted option.
Clear counters also make cleaning so much easier. You can wipe down the whole counter in 30 seconds without moving a bunch of stuff.
Step 6: Use Drawer Dividers and Cabinet Organizers
Even in a small kitchen, drawers and cabinets can get messy fast if everything’s just tossed in there.
Use dividers to keep things separated.
I used cheap plastic drawer organizers from the dollar store. One section for utensils, one for measuring stuff, one for random tools.
In cabinets, I used small bins or baskets to group like items. One basket for oils and vinegars. One for snacks. One for baking supplies.
You can also use tension rods vertically in cabinets to create dividers for baking sheets and cutting boards so they stand up instead of stacking.
Check out my guide on organizing on a budget for more free and cheap organizing ideas.
Step 7: Store Food Strategically
Pantry space is usually nonexistent in small kitchens. So you have to be smart about food storage.
Use clear containers for dry goods. Transfer pasta, rice, oats, flour, sugar into jars or containers you can stack. They take up less space than boxes and bags.
Keep only what you’ll use in the next two weeks. Don’t stock up on sale items if you have nowhere to put them. Buy what you need for the next week or two, then shop again.
Use cabinet doors or walls for extra storage. Over-the-door organizers can hold snacks, spices, or small food items.
Maximize fridge space. Use bins to group like items together. Store leftovers in stackable containers.
I also started meal planning specifically around my small kitchen. I only bought ingredients I’d use that week, which meant less food waste and less clutter in my tiny pantry area.
Here’s my full system for meal planning on a budget that works great for small kitchens.
The 5 Organization Rules for Tiny Kitchens
These are the rules I followed that made my small kitchen actually functional:
Rule 1: If you haven’t used it in three months, it doesn’t belong in your kitchen.
Be ruthless. Small spaces can’t hold stuff you “might need someday.”
Rule 2: Everything must have a designated spot.
No loose items floating around. If it doesn’t have a home, you don’t have room for it.
Rule 3: Use vertical space before buying more storage.
Walls, cabinet doors, and stacking upward are your best friends.
Rule 4: One in, one out.
If you buy a new kitchen item, get rid of an old one. This keeps your small kitchen from overflowing.
Rule 5: Clear the counter every night.
A 5-minute reset at the end of each day keeps the kitchen from getting chaotic. Put away dishes, wipe the counter, and start fresh tomorrow.
I do a 5-minute kitchen reset every night and it’s the only reason my kitchen stays organized.
What About When You’re Cooking?
Small kitchens get messy fast when you’re actually cooking because there’s nowhere to put stuff.
Here’s what I do:
Prep everything before you start cooking. Chop vegetables, measure ingredients, get everything ready. Then put away what you’re not using before you turn on the stove.
Clean as you go. While something’s cooking, wash the knife and cutting board you just used. Wipe down the counter. Put away ingredients.
Use one bowl for scraps. Keep a small bowl on the counter for vegetable peels, packaging, whatever. Dump it all at once instead of making multiple trips to the trash.
Have a drying rack or dish towel ready. Wash dishes immediately and let them dry on a rack or towel so they’re not piling up in the sink.
This system keeps the kitchen functional even when you’re in the middle of cooking.
Small Kitchens Are Actually Easier to Maintain
Here’s the upside of a small kitchen. It’s way easier to keep clean and organized than a big one.
Less stuff to organize. Less counter to wipe down. Less floor to sweep. You can clean the whole kitchen in 10 minutes.
I actually miss my tiny kitchen sometimes because it forced me to stay organized. Everything had a place, and I couldn’t let things pile up because there was no room.
Now I have a bigger kitchen and it’s so easy to let clutter accumulate. Small kitchens don’t give you that option, which is honestly kind of great.
Frequently Asked Questions
How do you organize a kitchen with no cabinets?
Use wall storage, over-the-door organizers, and freestanding shelving units. Hang utensils and pots on walls with hooks or a pegboard. Store dishes and food in open shelving or a small cabinet you bring in. Keep only absolute essentials. I lived in a studio with basically no kitchen storage and made it work with three wall-mounted shelves and a lot of hooks.
What should I keep in a tiny kitchen?
Only what you use regularly. One or two knives, one cutting board, one skillet and one pot, basic utensils (spatula, spoon, tongs), dishes and cups for your household, essential spices, and measuring cups. Get rid of duplicates and single-use gadgets. If you haven’t used it in three months, you don’t need it.
How do I maximize storage in a small kitchen?
Use vertical space with wall hooks and shelves. Store things upward with shelf risers and stackable containers. Use the insides of cabinet doors for extra storage. Keep counters clear except for daily essentials. Organize by zones so related items are together. And declutter ruthlessly so you only keep what you actually use.
How do you cook in a really small kitchen?
Prep everything before you start cooking so you’re not scrambling for space. Clean as you go to keep the counter clear. Use multi-use tools instead of having separate gadgets for everything. Keep your most-used items within reach and put away anything you’re not actively using. Plan simple meals that don’t require a lot of pots and pans.
What kitchen items can I get rid of?
Single-use gadgets, duplicate tools, dishes and cups you never use, pots and pans you rarely cook with, specialty appliances you only used once, expired spices and food, decorative items taking up counter space, and anything you haven’t touched in three months. Small kitchens force you to keep only the essentials.
How do I organize a small apartment kitchen on a budget?
Use what you already have. Cardboard boxes as drawer dividers, glass jars for food storage, adhesive hooks for hanging items, tension rods for vertical storage. Shop the dollar store for cheap bins and organizers. Focus on decluttering first so you need less organizing supplies. Most of my small kitchen organization cost under $15.
Start With the Declutter
If you take nothing else from this article, do this: pull everything out of your kitchen and get rid of what you don’t use.
That one step will make more difference than any organizing product or system.
Small kitchens can’t hold everything. So stop trying. Keep the essentials, use vertical space, organize by zones, and clear your counters.
I promise your tiny kitchen will feel so much more functional.
If you want a complete system for organizing your whole home (not just the kitchen), my 30-day home reset guide walks through every room with specific systems that work for small spaces.
But you don’t need that to start. Just declutter your kitchen this weekend and see how much better it feels. You’ve got this.
For the cleaning products and tools mentioned here, Amazon has everything you need delivered to your door.


What’s your top tip for maximizing space in a tiny kitchen? Check out the link for more ideas! #KitchenHacks #HomeOrganization #CozyCornerDaily