


That constant drip, drip, drip from your faucet is not just annoying. It is wasting water, running up your bill, and keeping you awake at night. The good news is, most dripping faucets are caused by one thing: a worn-out rubber washer that costs about 50 cents to replace.
- Why faucets drip in the first place
- What you will need
- Step 1: Turn off the water supply
- Step 2: Remove the faucet handle
- Step 3: Unscrew the packing nut
- Step 4: Remove the valve stem
- Step 5: Replace the washer
- Step 6: Reassemble everything
- Step 7: Turn the water back on and test
- What if you have a different type of faucet?
- How to prevent future drips
- Dripping faucet FAQs
You do not need to call a plumber and pay $100 or more for a service call. With a few basic tools and about 20 minutes, you can fix it yourself and finally get some peace and quiet.
If you are already frustrated with little things around the house that waste money, this pairs perfectly with finding the budget leaks that drain your wallet every month.
Why faucets drip in the first place
Most traditional faucets, especially older compression-style faucets with separate hot and cold handles, use rubber washers to create a seal when you turn the water off. Over time, those washers wear down, crack, or flatten from constant use and water pressure. Once the seal is no longer tight, water leaks through and drips.
Fixing a dripping faucet is not about being handy. It is about understanding that one small worn part needs replacing, and once you swap it out, the drip stops.
What you will need
You probably already have most of these tools at home.
An adjustable wrench or a set of regular wrenches to remove the faucet handle and packing nut. An adjustable wrench is the easiest option because it fits multiple sizes.
 1")
A flathead or Phillips screwdriver to remove the handle screw, depending on your faucet model.
Replacement faucet washers. You can buy an assorted washer kit that includes multiple sizes so you have the right fit. These kits cost a few dollars and last for years.
A small container or towel to catch water and keep track of small parts like screws.
Plumber’s grease (optional but helpful) to lubricate the washer and make it last longer.
That is it. No specialized plumbing tools required.
Step 1: Turn off the water supply
This is the most important step. Before you touch anything, you need to turn off the water supply to the faucet.
Look under the sink for two small shut-off valves, one for hot water and one for cold. Turn both valves clockwise until they stop.
If you do not have shut-off valves under the sink, you will need to turn off the main water supply to the house. That valve is usually near your water meter or where the main line enters your home.
Once the water is off, turn on the faucet to drain any remaining water in the line. Leave the faucet open while you work.
And if you are dealing with plumbing issues in general, like clogs or slow drains, you might also want to check out how to unblock a sink in 10 minutes for another common DIY fix.
Step 2: Remove the faucet handle
Most faucet handles are held in place by a small screw, either on top of the handle under a decorative cap or on the side.
If there is a cap on top, use a flathead screwdriver or your fingernail to gently pop it off. You will see a screw underneath.
Use the appropriate screwdriver (flathead or Phillips) to unscrew and remove the screw. Set it aside in your container so you do not lose it.
Pull the handle straight up and off the valve stem. It might be a little tight or stuck, especially if it has not been removed in years. Wiggle it gently until it comes loose.
If your faucet is different and you are not sure how it comes apart, a quick look at home repairs for zero experience walks through beginner-friendly approaches to figuring out unfamiliar fixtures.
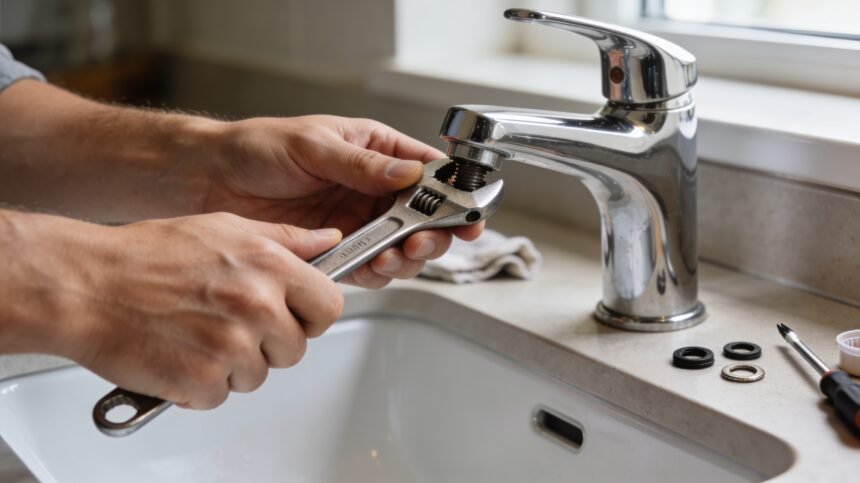
Step 3: Unscrew the packing nut
Once the handle is off, you will see a packing nut, which is the large hexagonal piece around the valve stem.
Use your adjustable wrench to grip the packing nut and turn it counterclockwise to loosen and remove it.
Set the nut aside carefully. Keep track of the order you remove parts in so you can put everything back together the same way.
Step 4: Remove the valve stem
After the packing nut is off, you will see the valve stem. Depending on your faucet, you might be able to just pull it out, or you might need to unscrew it by turning it counterclockwise.
Once you remove the valve stem, you will see the rubber washer at the bottom. This is the part that is worn out and causing the drip.
The washer is usually held in place by a small brass screw. Use your screwdriver to remove that screw, then pull off the old washer.
Take a good look at the washer. If it is cracked, flattened, or worn down, that is your problem.
Step 5: Replace the washer
Grab a new washer from your assorted washer kit that matches the size of the old one. If you are not sure, bring the old washer to the hardware store and match it up, or just buy a full Danco washer assortment so you always have the right size on hand.
Place the new washer onto the valve stem in the same position as the old one.
Screw the brass screw back in to hold the washer in place. Tighten it snugly but do not overtighten, or you will damage the new washer.
If you have plumber’s grease, apply a tiny bit to the new washer. This helps it seal better and last longer.
And while you are under the sink fixing things, it is a good time to check for other issues. If you have been noticing any pipe problems during cold weather, what to do when a pipe freezes covers another urgent fix you should know.
Step 6: Reassemble everything
Now you are going to put everything back together in reverse order.
Insert the valve stem back into the faucet body. If it screws in, turn it clockwise to tighten it.
Place the packing nut back over the valve stem and tighten it with your adjustable wrench. Snug it up, but again, do not overtighten.
Put the faucet handle back on and align it properly. Replace the screw and tighten it.
Snap the decorative cap back on if your faucet has one.
Step 7: Turn the water back on and test
Go back under the sink and turn the shut-off valves counterclockwise to turn the water back on. If you turned off the main water supply, turn that back on.
Slowly turn the faucet handle to the off position and watch for drips.
If the drip is gone, congratulations. You just fixed it yourself and saved at least $100 on a plumber call.
If it is still dripping slightly, the washer might not be seated correctly, or the valve seat inside the faucet might be damaged. You can try removing the valve stem again and repositioning the washer, or you might need to replace the valve seat, which is a bit more involved.
For more small wins like this that save you money and give you confidence around the house, check out how we saved $400 a month with 5 simple changes.
What if you have a different type of faucet?
This guide covers compression faucets, which are the most common type with separate hot and cold handles. If you have a single-handle faucet, a cartridge faucet, or a ball-type faucet, the repair process is a little different.
Single-handle faucets usually need a cartridge replacement instead of a washer. You will need to identify the faucet brand and buy the correct replacement cartridge.
Ball-type and ceramic disk faucets also have different internal parts. The process is similar (turn off water, disassemble, replace parts, reassemble), but the parts are different.
If you are not sure what type of faucet you have, take a photo of it and show it to someone at the hardware store. They can point you to the right replacement parts.
And if you are slowly building up your confidence with home repairs, 5 home repairs I finally learned to do myself and saved $500 shows you other beginner-friendly fixes that actually make a difference.
How to prevent future drips
Do not overtighten faucet handles when you turn them off. Cranking them down hard wears out washers faster. Turn them just until the water stops, then stop.
Replace washers every few years as part of regular maintenance, even before they start leaking. It is a 10-minute job once you know how, and it prevents drips before they start.
If you have hard water, consider a water softener. Mineral buildup can damage washers and valve seats over time.
Keep a washer assortment kit in your toolbox so you always have the right size on hand when you need it.
If you are working on keeping your whole home running smoothly without spending a fortune, you might also like 12 changes that helped us stop living paycheck to paycheck.
Dripping faucet FAQs
How much water does a dripping faucet waste?
A faucet that drips once per second can waste over 3,000 gallons of water per year. That adds up on your water bill and is terrible for the environment.
How long does a faucet washer last?
It depends on water pressure, usage, and water quality, but most washers last 1 to 3 years before needing replacement.
Can I fix a dripping faucet without turning off the water?
No. You absolutely need to turn off the water supply before disassembling the faucet. If you do not, water will spray everywhere as soon as you remove parts.
What if the faucet still drips after replacing the washer?
The valve seat inside the faucet body might be worn or damaged. You can try using a valve seat wrench to remove and replace it, or call a plumber if you are not comfortable with that step.
Fixing a dripping faucet is one of those small wins that feels really satisfying. You stop the annoying sound, save water, save money, and prove to yourself that you can handle basic home repairs. Keep a faucet washer kit and an adjustable wrench in your toolbox, and you are set for the next time a drip starts.
For the tools and materials needed for this project, Amazon has everything you need delivered to your door.


Have you tried fixing a faucet before? It’s easier than you think! Check out the guide. #DIY #HomeImprovement #CozyCornerDaily