


You know that feeling when you walk into your own house and everything technically works, but it all feels a little “starter home forever.” That was us. Fresh beige walls, shiny brass doorknobs, skinny little baseboards, the classic boob lights on the ceiling. Nothing was broken. It just looked like every other house in the neighborhood.
- Start where your eyes land first
- Eyesore 1: bland interior doors that look like a rental
- Eyesore 2: skinny trim and baseboards that feel cheap
- Eyesore 3: builder grade light fixtures that drag everything down
- Eyesore 4: cabinet hardware that screams “builder basic”
- Eyesore 5: blank walls with no personality
- Eyesore 6: chaotic entry that ruins your first impression
- Eyesore 7: the “nothing is actually wrong” feeling
- FAQs about fixing builder grade eyesores
For a long time I kept telling myself we would wait and “do it right” with a big renovation. New doors. New trim. Custom lighting. The whole thing. Then I looked at the actual numbers one day, the same way I finally did when I put together our brutally honest budget that finally worked, and realized there was no magical renovation fund sneaking up on us in the next six months.


So I tried something else. I picked one small builder grade eyesore and asked, “What is the lowest cost, lowest skill version of fixing this that still looks good.” That one tiny project snowballed into a handful of weekend upgrades that made our house feel more custom long before we changed any major finishes. If you like the idea of a 30 day home reset or simple home repairs every parent should learn, this fits right in that same “normal person can actually do this” category.
Start where your eyes land first
Here is the thing. You do not have to fix every builder grade thing at once. You just need to fix the stuff your eyes trip over every single day. For us, that was doors, trim, hardware, and lighting. The good news is, those are exactly the projects designers and DIYers keep recommending as the highest impact upgrades for builder grade homes.
Before you touch a paintbrush, walk through your house like a guest. Come in through the front door, stand in the hallway, glance toward the kitchen, walk down the main hallway. Whatever makes you think “ugh, that” the loudest is where you start. If you are already working through a 30 day home reset or using a spring cleaning checklist, let this be the “reward” for finishing one area instead of another random project that pulls you off track.
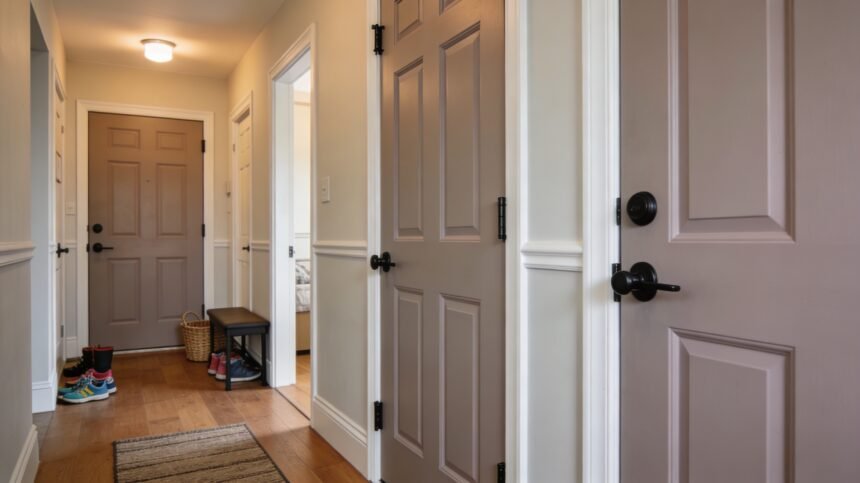
Eyesore 1: bland interior doors that look like a rental
I am convinced that painted interior doors are one of the most underrated upgrades on the planet. Every time I see people transform builder grade homes into custom looking spaces, painted doors are right up there with lighting and trim. I did not believe it until I painted our first hallway door a soft, deep charcoal. Suddenly the generic beige walls looked intentional and the hallway felt designed, even though we had not changed anything else.
If your doors are already in decent shape, you do not need to replace them. You need three things: a good cleaning, the right paint, and patience. I learned a lot from professionals who show how to paint interior doors and trim without leaving brush marks. My two big takeaways: lightly sand glossy doors so the new paint can grab, and use a small foam roller for the flat areas so the finish looks smooth, not streaky.
Hardware makes a huge difference too. Switching from clunky brass knobs to simple black levers instantly updated our doors. This is also where your budget brain can relax a little. Swapping door hardware is still so much cheaper than buying all new doors, the same way doing a few basic home repairs yourself is cheaper than calling a pro for every tiny thing. If you are just getting comfortable with that, my zero‑experience home repairs guide is a good confidence boost.
If the idea of painting a whole hallway of doors feels overwhelming, start with the one you see most: maybe the front coat closet or your bedroom door. I like pairing this with a quick 10 minute closing shift at night so the hallway actually stays clear enough that your pretty new door is not hidden behind laundry baskets.
Eyesore 2: skinny trim and baseboards that feel cheap
Once I noticed how small and skinny our trim was, I could not unsee it. It made the whole house feel a little unfinished. The good news is you do not have to rip everything out to get a more substantial look. A lot of DIYers are using simple tricks to upgrade builder grade trim with basic boards or even layered molding.
If you are comfortable with a saw and a nail gun, you can go full “trim upgrade” on your own time. If that sounds like a lot, there are still easy wins. One beginner friendly trick is adding a slightly wider board on top of your existing baseboard, then caulking and painting everything one color so it reads as a single, thicker piece. Another option is adding craftsman style door trim around a few key openings like the hallway and main bedroom, similar to the way people update door trim in simple DIY videos.
Whatever route you pick, the finishing steps are where it goes from “hmm, DIY” to “did they hire someone.” Caulking gaps, filling nail holes, and using the right paint sheen matters. I like to keep this project tied to my 30 day home reset calendar so we are not tearing apart trim in three rooms at once. One hallway or one doorway at a time is plenty.
Eyesore 3: builder grade light fixtures that drag everything down
Those basic flush mount lights that came with your house are quietly sabotaging all your other efforts. Lighting is one of the fastest ways to move a builder grade space toward “this feels custom,” and you do not have to spend a fortune.
Swapping entry and hallway fixtures for something simple but intentional makes a huge difference. Think clean drum shades, small chandeliers, or semi flush mounts in finishes that match your hardware. This is a classic weekend project, and if you are nervous, you can follow along with step by step lighting swap videos from electricians and experienced DIYers.
If hardwiring new fixtures freaks you out, start with plug in sconces, lamps, and better bulbs. I talk more about that in my low stress smart home upgrades post, but the short version is this: warmer bulbs, more lamps, and fewer harsh overheads make your home feel calmer instantly. It also plays really nicely with an evening routine that saves your sanity, because your space literally looks softer at the end of the day.
One tiny pro tip: once you upgrade your lighting, you will notice dust and grime more. Pair this project with a short daily cleaning routine or a kitchen reset habit so your pretty new fixtures are not highlighting every crumb and smudge.
Eyesore 4: cabinet hardware that screams “builder basic”
If your budget is tight, changing cabinet hardware in the kitchen, bathrooms, and even on built‑ins might be the best cost‑per‑impact upgrade you can make. Designers and DIYers constantly list hardware as one of the quickest ways to make a builder grade home look more custom.
You can go two directions here. One is a full swap to brand new knobs and pulls in a finish you love. The other is using good spray paint to update what you already have, which plenty of people do successfully when they are not ready to invest in all new hardware yet. I have done both. When money was tight, I used high quality spray paint on bathroom hardware and it held up surprisingly well. Later, when our budget was a little softer thanks to fixing some everyday leaks and impulse spending, I splurged on new handles for the kitchen after working through where our money was actually leaking.
This is also a sneaky good moment to clean and declutter those cabinets. There is something deeply annoying about putting beautiful new hardware on doors hiding stuff you never use. If you need a place to start, my pantry organization method and small kitchen organization system both walk through realistic ways to clear cabinets without pulling your whole house apart.
Eyesore 5: blank walls with no personality
Most builder grade homes come with a sea of plain walls. That blankness can actually make your house feel cheaper, not calmer, especially when everything else is standard issue. Adding a little architectural interest is one of the big themes in current builder grade upgrade guides.
You do not have to dive into full wall paneling to play with this. A simple board and batten half wall in an entry, a small picture‑frame molding detail in a hallway, or even just one intentional accent wall in the living room can make your place feel more “you.” If you are nervous about saws and math, you can start with peel and stick options, or combine this with the renter friendly peel and stick makeovers we already talked about.
Personally, I like to treat these wall projects as phase two, after the doors and lighting. I also try to stack them with broader home reset goals. For example, if I am already doing a February home organization push or working through that spring cleaning checklist, I will plan one wall project for the month after the clutter is handled so I am adding character to a room that already functions.
Eyesore 6: chaotic entry that ruins your first impression
The entry in a builder grade home is usually a blank wall, one sad light fixture, and a pile of shoes. It does not matter how nice your kitchen is if everyone’s first impression is “wow, they are struggling.” A simple entry upgrade can completely change how your home feels the second you step inside.
I like to think of the entry as a mini command center. One bench, a few sturdy hooks, maybe a small shelf or basket for keys and mail. When we finally set up a simple command center that keeps our family organized, our entry stopped being a dumping ground and started feeling like the calm start of the house instead of the chaos gateway.
If you want to layer in more character, you can paint the inside of your front door a fun color, upgrade the trim around it, or add a small accent wall treatment behind the hooks. These are all manageable weekend projects that make your builder grade entry look like a custom moment.
Eyesore 7: the “nothing is actually wrong” feeling
Here is the part that is harder to name. A lot of builder grade homes suffer from a general “nothing is actually wrong but I do not like it” vibe. That feeling matters. It is the same feeling that finally pushed me to stop deep cleaning randomly and build a daily cleaning schedule that actually works. You deserve to like your home, even if you are not doing a full renovation.
If decision fatigue is your biggest barrier, give yourself a limit. One builder grade upgrade a month. Under a set dollar amount that fits the realistic version of your budget, not the fantasy one. Maybe that means this month you paint one hallway of doors, next month you swap a light fixture, and the month after that you tackle cabinet hardware.
To keep yourself from accidentally turning “home upgrades” into “new way to overspend,” it can really help to pair this with money systems that are already working for you. That might be the 48 hour cart rule that stops impulse buying, a no spend weekend plan, or the system I used to stop the Amazon spending spiral. The goal is for these upgrades to make your life feel lighter, not heavier.
FAQs about fixing builder grade eyesores
Where should I start if everything looks boring?
Start where your eyes land first. For most people that is doors, lighting, or the entryway. Pick one small project, like painting the interior side of your front door or swapping a hallway light, and let that win give you momentum before you move on to the next thing.
Do I need power tools for these upgrades?
Some projects, like full trim changes, are easier with saws and a nail gun, but many builder grade fixes only need basic tools: a drill, screwdrivers, a level, caulk, and paint supplies. If you are brand new, start with painting doors, changing hardware, or swapping plug in lighting before you tackle anything that touches electrical or structural elements.
How much should I budget for weekend upgrades?
It depends on your house size and taste, but many people can paint a hallway of doors, upgrade a couple of lights, or swap hardware for around $100 to $150 per project. Decide what you can comfortably cash flow without touching bills or savings, then design your project list around that number instead of the other way around.
Is it worth upgrading a house I might move out of?
In my opinion, yes, as long as you are not overspending. Small upgrades that make your home feel better to live in right now are worth a lot, even if you move in a few years. Many of these changes, like better lighting and neutral hardware, can also help with resale because they make the home feel more updated and cared for.
How do I keep the house from getting messy again while I am doing projects?
Projects can create temporary chaos, so it helps to anchor your days with a short daily cleaning routine or closing shift that resets the main living areas. Even five to fifteen minutes of picking up and wiping counters keeps the mess from snowballing while you have tools out and paint drying.


Which eyesore would you tackle first? Check out the link for some great ideas! #HomeImprovement #DIY #CozyCornerDaily